(1).png "PowerHome.com")
With the increasing awareness of environmental protection and the growing importance of renewable energy, solar panel installation has become a hot topic. As a device that utilizes sunlight to convert light energy into electricity, the installation method of PV panels not only affects the efficiency of power generation, but also the service life of the panels. This blog will introduce solar panel installation methods to help readers better understand and operate solar panels.
Positioning & Site Selection
Before installing solar panels, proper positioning and siting is required first. Choose a place with abundant sunlight resources to avoid shadow shading and tall buildings. Southern orientation is the best direction to install solar panels, as the south can get the longest sunlight hours. In addition, ground mounted solar panels should be chosen away from objects such as trees and utility poles to ensure that the panels are not obstructed in any way. Homeuse PV panels can be installed in a variety of places:
- Roof Installation: Solar panels can be installed on the flat or sloping roof of a house. It is important to make sure that the roof can support the weight of the panels and to choose the right angle and orientation to maximize light absorption.
- Ground Installation: If you don't have enough roof space or need to install a larger solar system, you can choose to install it on the ground. Brackets or pilings can be used to secure the panels and ensure their stability.
- Wall Installation: Solar panels can also be mounted on walls, especially if there is no roof space or if they need to be installed on a vertical surface.
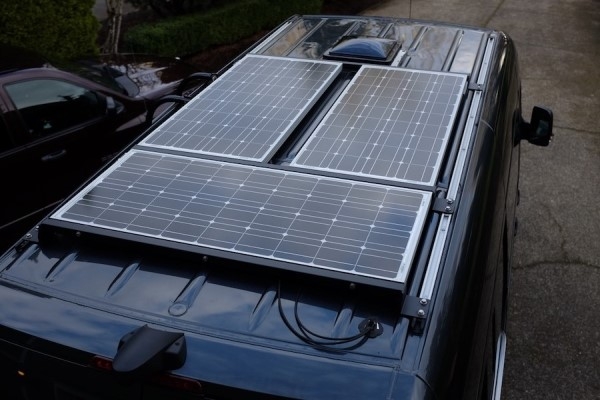
On the other hand, portable solar panels used in camping and picnics, can rely on brackets to be mounted on the ground, or on the roof of a car or tent top. Due to the more abundant sunlight in the field, the choice of locations available for mounting panels is more flexible.
Installation Steps
Installing Bracket
Once the preparations are complete, the installation of the photovoltaic panels can begin. Mounting bracket is the first step, the design and material selection of the bracket is crucial for the safety and stability of the photovoltaic panel. Stainless steel or aluminum alloy can be chosen as the bracket material, these materials are not easy to be corroded and have greater strength. Depending on the surrounding environment and needs, different types of mounting brackets can be chosen, such as ground mounting brackets, roof mounting brackets, etc.
Installing Solar Panels
Once the mounting bracket is complete, the solar panels can be installed. Before installation, make sure the surface of the panel is clean and free of dust or impurities. During the installation process, pay attention to connecting the panel to the bracket firmly to avoid being shaken by external forces. Follow the correct procedure according to the installation guide provided by the manufacturer.
Connecting Cables
The wiring connection of the solar module is a very critical step. Before wiring, identify the positive and negative terminals of the panels. Next, list the loads that need to be powered and then calculate their electrical energy requirements. If more power is required, then it is necessary to choose the appropriate solar connectors to form a solar panel array with multiple panels, with both series and parallel connections available. The diagram below shows how a PV panel array is wired using a parallel connection:
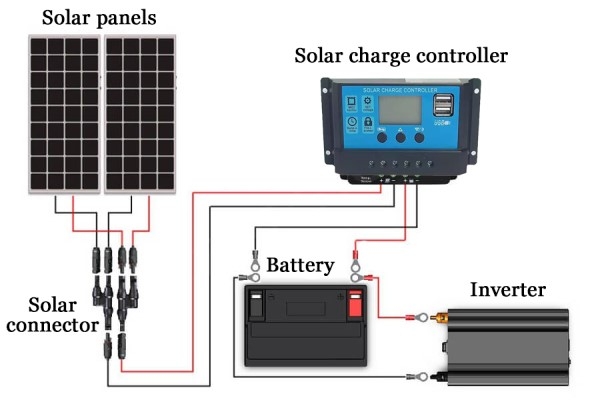
It can be seen that the two solar panels are connected together in parallel using Y-connectors, and then connected to a solar charge/discharge controller (used to control the amount of output current), after which the battery and inverter are connected. Finally, the inverter converts the DC power to AC power and then supplies energy to the load.
Protection & Maintenance
After the installation of the solar module is completed, you need to do a good job of protection and maintenance to ensure its long-term stable use. Firstly, clean the dust and dirt on the surface of the panel regularly to maintain the high efficiency of the panel in absorbing light. Secondly, check whether the electronic components are functioning properly, such as cables and junction boxes. If any problems are found, they should be repaired or replaced in time. Meanwhile, check the brackets and fixing screws of the battery panels regularly to prevent loosening due to weather.
Installation Notes
- Installation of photovoltaic panel array needs to consider the installation azimuth, tilt angle.
- Shading between panels should be avoided; whether there is dust or oil on the surface of the panels, please wipe it with a soft cloth.
- The alignment distance should be as short and even as possible. The wiring should be firmly connected to prevent false or broken connections; remember to remove the connecting wires after the power is disconnected.
- During the wiring process, pay attention to prevent polarity reversal, short circuit and other phenomena to avoid causing explosion and fire.
- The installation place must be open, and there should not be tall buildings or other things blocking the sunlight at the installation place.
Whichever installation method is chosen, it is necessary to follow the relevant safety codes to ensure the stability and safety of the panels and to ensure maximum absorption of light for optimum power generation efficiency. In addition, there is a need to ensure proper wiring and use of appropriate components to convert and store solar electricity.
If you are not familiar with the installation process or need a more complex system, it is recommended that you hire a professional to do the installation. PowerHome provides you with professional technical support, if you encounter difficulties in the process of installing solar panels, please feel free to consult us.
(1).png)


