(1).png "PowerHome.com")
Hand crank generator, also known as hand crank DC generator, is a device that produces electrical energy by manually cranking the generator rotor. The basic principle is the phenomenon of electromagnetic induction, in which an electric current is generated by motion. Hand-cranked generators are usually used in emergencies or to provide limited power in remote areas where there is no power source. Although these generators are less efficient and require human assistance, they are small, portable and have flexible usage scenarios for outdoor emergency use.
PowerHome is an online store dedicated to providing clean energy generators and other accessories, as well as a blog to answer your questions. Our philosophy is Power your Off-grid Home. In this blog, we'll show you how to make a DIY hand crank electric generator model.
Basic Knowledge
A hand crank generator is the most basic type of generator. Before making one, let's understand the basic structure of a motor and why it generates electricity:
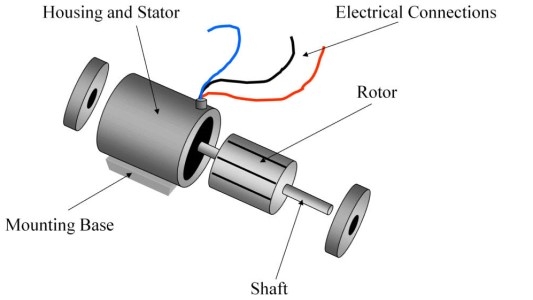
As shown in the figure above, the most critical structures of a motor are the stator and rotor, connected by a shaft of bearings that runs through both of them.
- Stator: It is the stationary part of the motor that does not rotate and usually consists of an iron core and a coil winding that generates a magnetic field.
- Rotor: it is the rotating part of the motor, which converts mechanical energy into electrical energy through the principle of electromagnetic induction.
By the electromagnetic induction principle, we mean that a wire is made into a coil and put into a magnetic field to rotate in order to produce an electric current. When a hand-cranked generator is operated manually, the rotor keeps rotating in the magnetic field produced by the stator, which generates an electric current in the coils inside it to drive the load to work.
To summarize, the most important thing you can do to make a hand crank generator that actually works is to make a handle and other parts that can be attached to the rotor and rotate it.
Materials List
- Cardboards (many pieces)
- Scissor
- Glue
- Iron wire (for drilling holes)
- Cotton swab
- Chopstick
- Rubber band
- A small motor
- LED light and soldering tool (for testing)
DIY Process
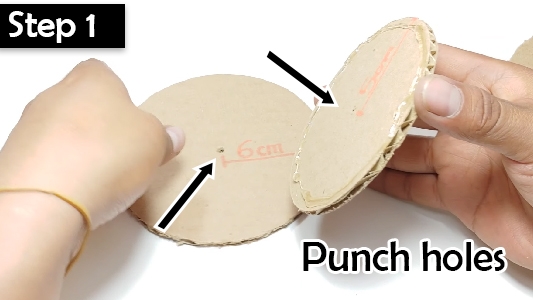
Step 1: Cut the cardboard into 2 pieces of circle with a radius of 6cm and 1 piece of circle with a radius of 5cm, and perforate the center of their circles.
Step 2: With the centers of the circles as reference, use the two larger circles to sandwich the smaller circle in the middle and secure it with glue. Next, use the steel wire again to run through the centers to ensure alignment. We'll call this circle Runner A.

Step 3: Cut 4 isosceles triangles out of cardboard, with a waist length of 13cm and a base length of 10cm, and glue them together to form 2 thicker triangles. Punch holes in the upper center of the triangles and use them to sandwich Runner A made in Step 2. Align the holes with each other and glue.
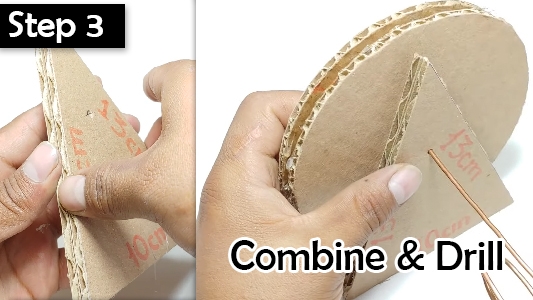
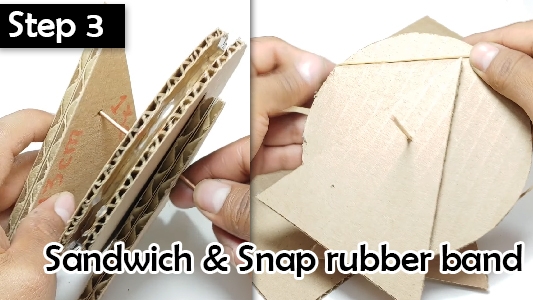
Note: The holes on triangles need to be punched a little further up to ensure that the final combination resembles a waterwheel shape (i.e., the circular cardboard stays suspended). Finally, snap a rubber band around the edge of Runner A.
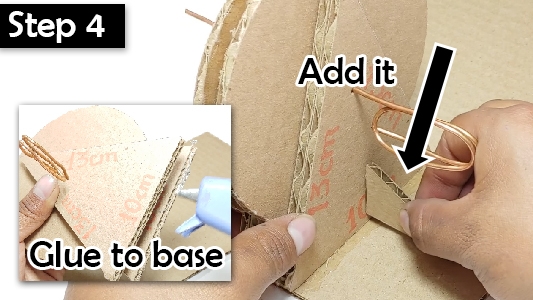
Step 4: Take a piece of rectangular cardboard, glue this mini "waterwheel" on it, and then make 2 smaller right-angled triangles glued in the position shown in the figure as a support to ensure its stability. This makes the support part of the hand crank generator.
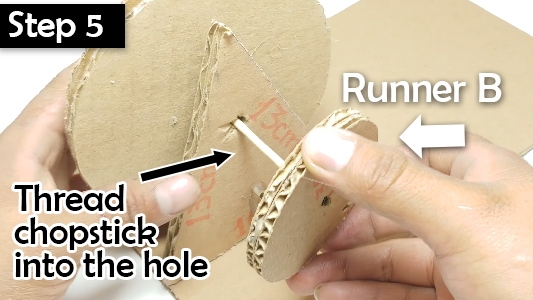
Step 5: Remove the steel wire and replace it with a chopstick (preferably on the cylindrical side). Make another round cardboard with a radius of 3.5cm. It needs to be of a certain thickness and can be made by stacking two pieces of cardboard. Punch a hole in the center of the circle and thread the chopstick into it, then secure it with glue. We will call this circle Runner B.
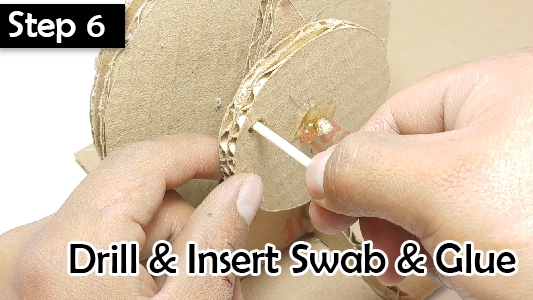
Step 6: Punch a hole in any part of Runner B, insert a cotton swab and secure with glue. This will serve as the handle used for rotation.
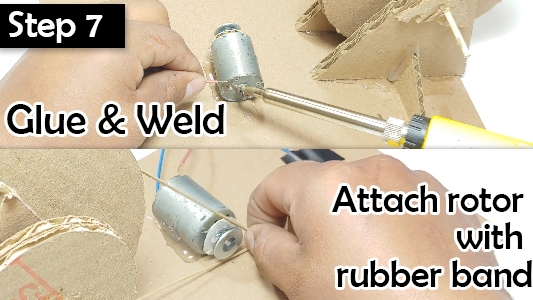
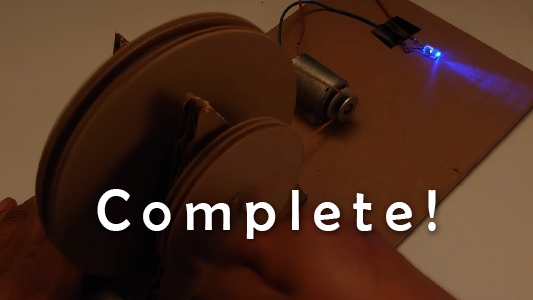
Step 7: Take out the prepared motor and LED light, glue them on the cardboard base, and then solder the wires of the LED light to the positive and negative outputs of the motor. Using the rubber bands mentioned in Step 3, connect Runner A to the rotor.
Finally, turn off the light to test. While hand cranking the handle, Runner A and Runner B will drive the rotor of the motor to rotate together, generating an electric current to light up the LED.
These steps will guide you through the process of making a simple model of a hand-cranked generator. Not only is this a fun project, it can also help you better understand the basic principles of power generation and energy conversion.
However, DIY a hand crank powered generator can be a learning experience. For actual use, it is recommended to purchase professional equipment. You may also wish to consider adding further functional parts, such as an off-grid inverter, voltage regulator, rectifier, etc., according to your specific requirements and needs, to enhance the practicality of the generator. PowerHome offers a comprehensive range of high-quality generators and related devices, which we hope you will find suitable.
(1).png)


