(1).png "PowerHome.com")
A solar charge controller is an electronic device that can control solar equipment. It can be used as a core component of a PV power system to manage other devices in order to maximize the use of solar energy resources for energy conservation, safety and efficiency. If you are interested in using a photovoltaic system to power your off-grid life, this blog brings you a guide to operating a solar charge controller that may be just what you need.
Steps for Installation & Use
Always check the solar controller and other PV modules carefully to make sure they are in good condition before installation. Extra attention should be paid to the need to select the right solar charge controller for your PV energy device and load.
Specific requirements are: the output voltage of the solar panel must be the same as the rated input voltage of the solar controller; the output power of the solar panel must not exceed the maximum input power of the controller; and the output power of the controller needs to meet the requirements of the desired load.
Depending on the brands and types, the installation of solar controllers will be different, and you need to check the instruction manual of the specific product. The following is a more general way to use the solar controller:
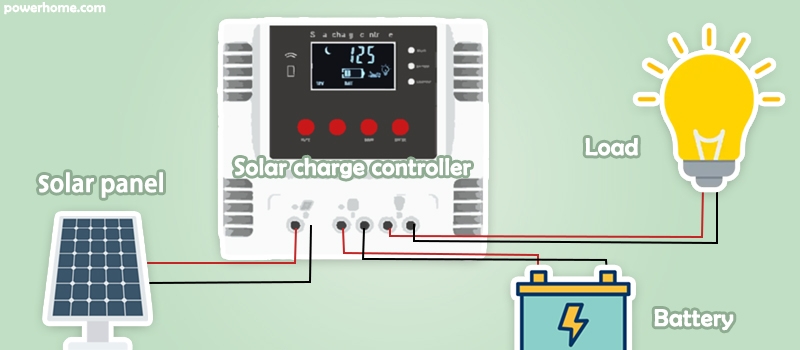
- Connect the positive and negative terminals of the battery to the controller. At this point, the controller will automatically detect the battery voltage.
- Sequentially connect the load and solar panel to the controller. When connecting, you need to be careful not to reverse the positive and negative poles.
- After the connection is completed, turn on the power switch on the solar charge controller. Generally speaking, the indicator light on the solar controller lights up, which means that it has been successfully connected to the battery, load and solar panel.
Configuration & Setup
- Initial Setup: Perform the initial setup, such as setting the battery type (lead-acid, lithium-ion, etc.), voltage level, and other necessary parameters, according to the instructions in the user's manual. Make sure the setup parameters are compatible with your system.
- Adjust the LCD Display: If the controller is equipped with an LCD screen, adjust the contents of the screen display, such as voltage, current, charging status, as needed.
- Activate Protection Functions: Make sure that the protection functions on the controller such as overcharge, over discharge, and short-circuit have been activated to protect the battery and system safety. These protection functions can prevent the battery from overcharging or discharging and extend the battery life.
- Charging Modes: Solar controllers generally support a variety of charging modes, such as float charging, constant current charging and constant voltage charging. When setting the charging mode, it should be selected according to the battery pack type and capacity, and adjusted according to the practical conditions.
Load Output Control Mode
The load output control modes of a solar controller typically refer to how the controller manages the supply of power to the load to ensure system stability and the life of solar powered panels and battery. These modes can include the following:
Pure Light Control Mode
When there is no sunlight, the light intensity drops to the start point, the controller delays for 10 minutes to confirm the start signal and then turns on the load according to the set parameters, and the load starts to work; when there is sunlight, the light intensity rises to the start point, the controller delays for 10 minutes to confirm the shutdown signal and then shuts down the output, and the load stops working.
Light Control + Time Control Mode
The startup process is the same as pure light control, when the load works to the set time, it will be shut down automatically, the setup time is from 1 to 14 hours.
Manual Mode
In this mode, the user can control the opening and closing of the load by pressing the button, regardless of whether it is daytime or nighttime. This mode is used for some special load occasions or for debugging.
Debug Mode
Used for system debugging, when there is a light signal, the load will be closed, no light signal to open the load, convenient for installation and debugging to check the correctness of the system installation.
Normally Open Mode
In this mode, the load is kept at all times in the output state, which is suitable for loads that require 24-hour power supply.
Monitoring & Maintenance
- Monitor System Performance: Regularly check the status of the solar charge controller and batteries to ensure proper system operation. Monitor parameters such as voltage, current and charging status to ensure that the system is working in the best condition.
- Software or App Control: If supported by the controller, you can use the appropriate software or smartphone app to monitor and control the charging process. This allows you to manage the system in remotely and improve convenience.
- Adjust Charging Parameters: Depending on seasonal changes or system requirements, you may need to adjust the parameters of the charge controller, such as charging voltage, current, PWM frequency, etc. to optimize performance.
- Troubleshooting: If you encounter problems during system operation, please read the troubleshooting guide in the user manual or contact the manufacturer's technical support. PowerHome provides simple consulting services, your mail is welcome.
By following these steps, you should be able to successfully install, configure, and use the solar charge controller to ensure that your solar power system operates at peak efficiency and safety. Always follow the user manual and safety guide to ensure your security and proper use of the equipment.
(1).png)


