(1).png "PowerHome.com")
A solar connector is a kind of connector specially designed for solar energy system, which has the characteristics of waterproof, dustproof and UV protection, and is able to work stably in harsh outdoor environments. It usually consists of two parts, a male connector and a female connector, which need to be plugged together correctly when used to realize the electrical connection. Simple installation is a great advantage of solar connectors, and it is this feature that makes it possible for individuals to set up their own solar power system. If you are interested in it and want to challenge your own hands-on ability, you can visit our "How to DIY" page for further information.
Installation Steps
To begin with, you need to confirm the type of solar connector, in this article we will use the most common MC4 connector as an example. The MC4 connector crimp points are self-locking for easier and tighter connections. If you have purchased a component such as a solar panel or inverter that has pre-assembled cables with MC4 connectors, the connection is completed by simply connecting it to the PV connector:
- Rotate the male connector to align it with the female connector's hole, and then push in the female connector until a "click" sound is heard, which indicates a successful pairing.
- After that, you need to gently turn the male connector to make the connection with the female connector tighter and firmer to complete the lock.
However, if the equipped cable is not long enough, or if there are other reasons such as incompatibility, then you will need to install the solar panel connector yourself:
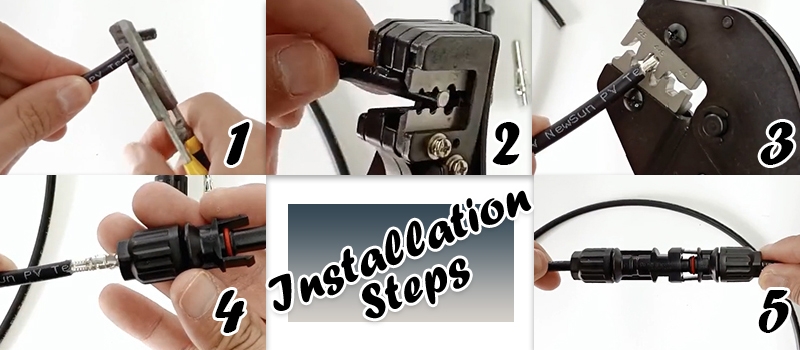
- Prepare the required tools, including wire stripper, wire cutter, wire crimper, and wrench. Use wire cutter to cut the wire to the required length.
- Use wire stripper to strip a small part of the insulation to expose the internal core wire (the length is judged according to the length of the terminal, usually between 5-10mm).
- Place the terminal in the position of the crimper jaws, then place the freshly stripped wire into the terminal and crimp firmly. When finished, be sure to verify that the crimp is secure.
- Insert the crimped terminal into the housing and tighten the nut with a wrench. This completes the crimping of one of the connectors, and the same procedure is used for the other connector.
- Finally, connect the male and female connectors and refer to the previous paragraph to ensure successful locking. If you want to unlock it, use a wrench as well.
Note: Although black wires are used uniformly in the demo diagrams, the red wires are generally used to connect the positive terminal and the black wires to connect the negative terminal.
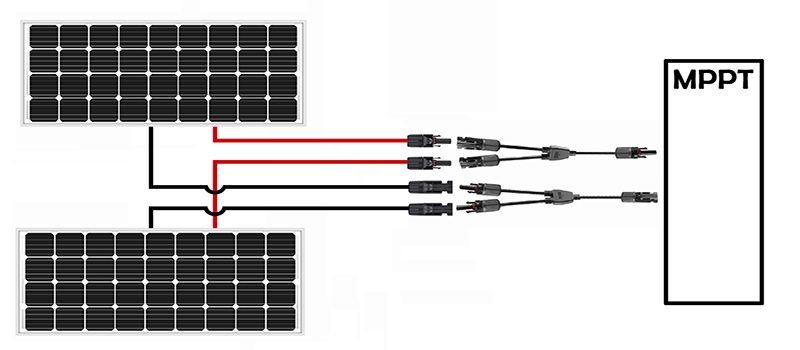
Application of Multi-branch Solar Connectors
There are some PV connectors that have a special shape because it bifurcates in a shape that resembles the letter Y, hence the name Y branch connector. In addition, according to the same naming convention, there are also types of connectors such as H branch. N to 1 multi-branch connectors are characterized by the ability to connect multiple solar panels in parallel to a single device.
For example, when an inverter needs to be connected to multiple solar panel arrays and there are not enough access ports, this type of connector is needed. Not only that, multi-branch connectors can also simplify the wiring process and reduce the overall complexity of the solar system. Please refer to the diagram below for specific connections:
Tips for Use
Select the right type and reliable quality of solar panel connector as required, as well as the right length and size of cable, so as not to affect the electrical connection.
- Before wiring, carefully check the surface of the cable for scratches, oxidation and rust marks. If any are found, please replace them immediately.
- When operating, you need to follow the correct steps and operating requirements, always make sure that the power supply has been fully disconnected to avoid electric shock; do not forcefully pull out or insert the connector to avoid damage to the connector or wire.
- Check whether the crimping location is waterproof and moisture-proof, and use special tools to wrap the exposed connection. Avoid operating under extreme conditions such as strong high temperature, wind, heavy rain, etc., which may easily cause circuit short-circuiting and thus shorten the service life of the PV module.
- The state of the solar connector requires regular maintenance and inspection to ensure that there is no looseness, oxidation, corrosion.
In summary, the correct use of solar connectors is one of the keys to the operation of solar systems, and we need to carefully grasp every detail. At the same time, the correct connection can improve the efficiency and service life of the PV module, contributing to the cause of environmental protection. PowerHome provides you with high quality solar connectors and perfect after-sales service, if you have questions about the use of connectors, please feel free to inquire!
(1).png)


